15 Fresh Nail Designs to Brighten Up Your Late Spring Look
This post may contain affiliate links. If you click and buy, we may earn a small commission at no extra cost to you. Learn more.
OK soooo I’ve been DYING to share these nail ideas with y’all!! 🤩💅 I literally spent all weekend scrolling thru Pinterest and trying out diff designs on my poor sister (she’s the best guinea pig lol) and I think I finally nailed down the cutest late spring looks!!!
Contents
- 1 Why Your Nails Need a Spring Refresh
- 2 1. Pastel Watercolor Washes
- 3 2. Minimalist Daisy Accents
- 4 3. Sorbet Gradient Tips
- 5 4. Gingham Check Accent
- 6 5. Transparent Jelly Nails
- 7 6. Pressed Flower Art
- 8 7. Citrus Slices
- 9 8. Sage and Gold Geometric
- 10 9. Cherry Blossom Ombré
- 11 10. Negative Space Crescents
- 12 11. Meadow Green Marble
- 13 12. Iridescent Butterfly Wings
- 14 13. Lavender Herringbone
- 15 14. Rain Drop Glitter
- 16 15. Mint Chocolate Chip
- 17 How to Make Ur Spring Nails Last Forever (or at least a week lol)
- 18 Shop the Look: Products I’m Legit Obsessed With
- 19 Color Combos That Just Work
- 20 Final Thoughts cuz this got wayyyy too long lol
Why Your Nails Need a Spring Refresh
Ughhh is anyone else SO over their winter nail routine?? Like I’ve been doing the same boring neutrals since FOREVER and my fingers need some freakin’ color!! Late spring is the PERFECT time to try something new cuz you can go bright without looking totally crazy (saving my neon orange for July haha).
I’ve rounded up 15 nail ideas that are giving me LIFE right now – some I’ve already tried, some are on my to-do list for my next appointment with Jen (my nail girl who deserves an award for putting up with me changing my mind 800 times). Some are super easy to DIY if you’re on a budget (me after I spent wayyyy too much on Sephora’s spring sale 🙈) while others might need a pro touch!
Here we gooooo!!
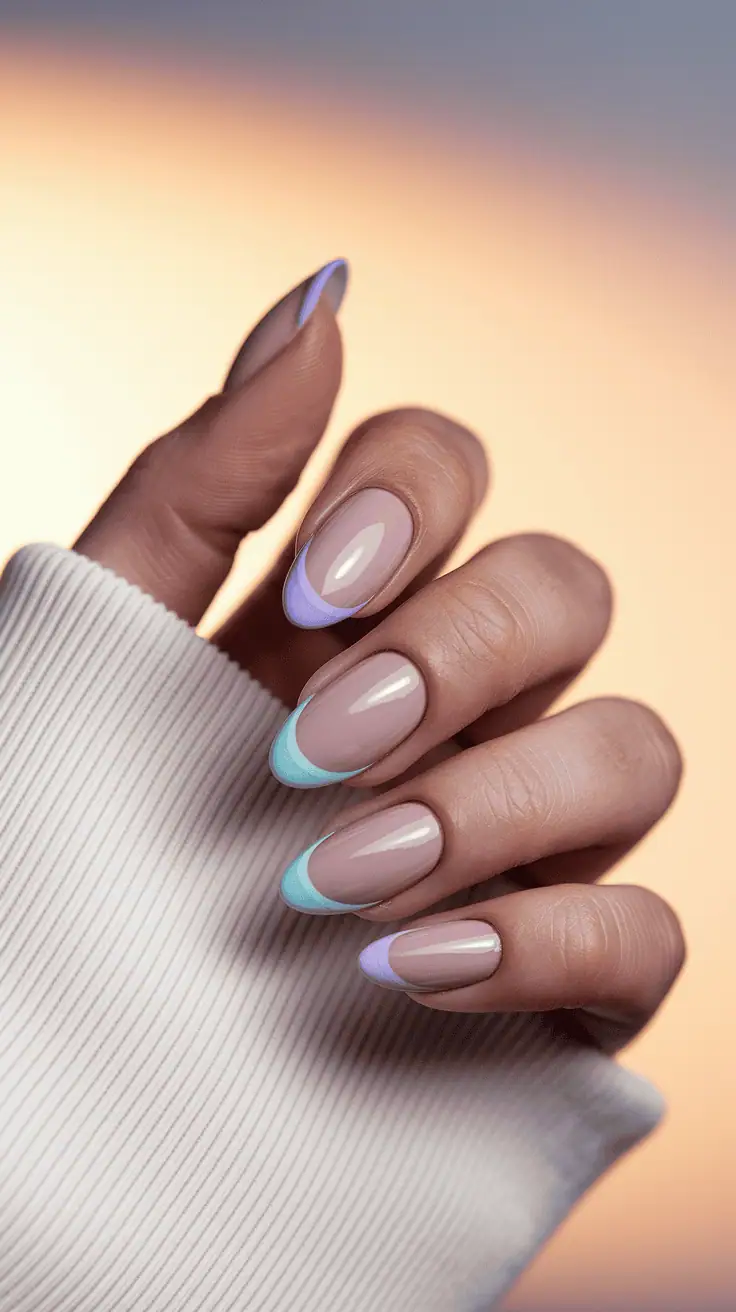
1. Pastel Watercolor Washes
OBSESSED with this look!!! It’s these soft pastel shades that kinda melt into eachother like a watercolor painting? I tried it with lavender + mint + baby blue and omg it’s so dreamy and perfect for spring. It def looks best on longer nails but my friend Kaylee did it on her short nails and it was still super cute!!

DIY Tip: K so put down a white base coat first (i forgot this step and had to start over lollll), then grab a makeup sponge and dab on watered-down polish. The colors should overlap a bit. Top with something super glossy and ur good to go!
2. Minimalist Daisy Accents
This is my go-to when I need something that won’t make my boss give me side-eye 👀 Just cute lil white daisies on a sheer pink/nude base. Its subtle but still says “hey look i’m festive!!” without screaming it.

DIY Tip: Use a bobby pin (or a dotting tool if ur fancy) to make white dots, then add 5 tiny white lines around each dot for petals. I usually add yellow centers but totally up to you!!! So simple but looks like u tried way harder than u did lmao.
3. Sorbet Gradient Tips
OMG this is like the french mani’s cool younger sister!!! Instead of boring white tips, u do bright sorbet colors (I’m loving mango + raspberry + lemon) that fade into each other. My coworker did this for our office party and even our super strict manager complimented her!!
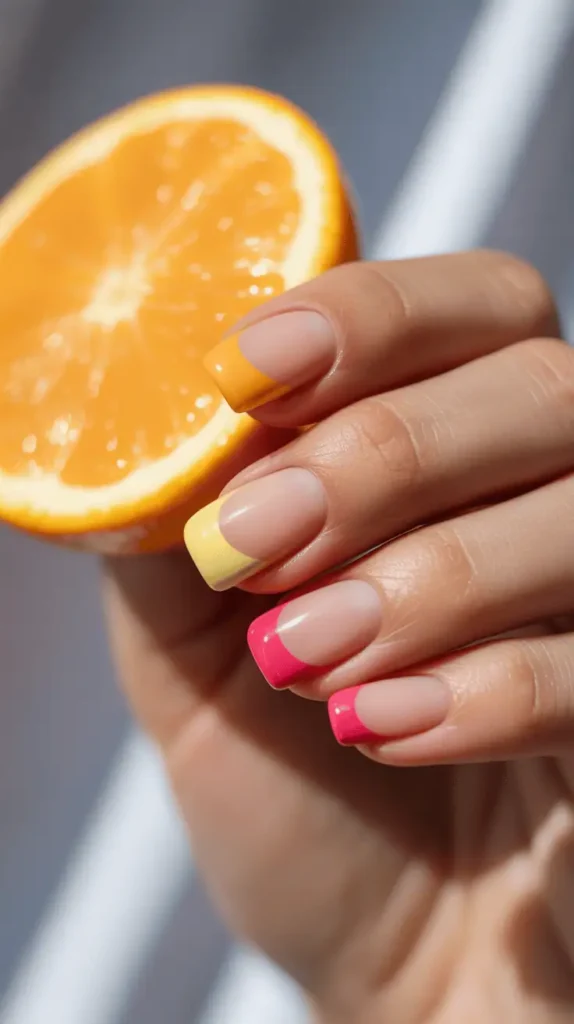
DIY Tip: This ones kinda tricky ngl. Those lil triangle makeup sponges are clutch! Cut them smaller if u need to. Do ur base color first (clear or nude) and let it COMPLETELY dry b4 sponging on the tips. I ruined mine being impatient lol.
4. Gingham Check Accent
OK this is soooo freakin’ adorable I can’t even!! Lil gingham patterns in pastels gives me major picnic vibes. I usually just do it on my ring fingers cuz doing it on all 10 would take foreverrrr and I don’t have that kinda patience! 😂
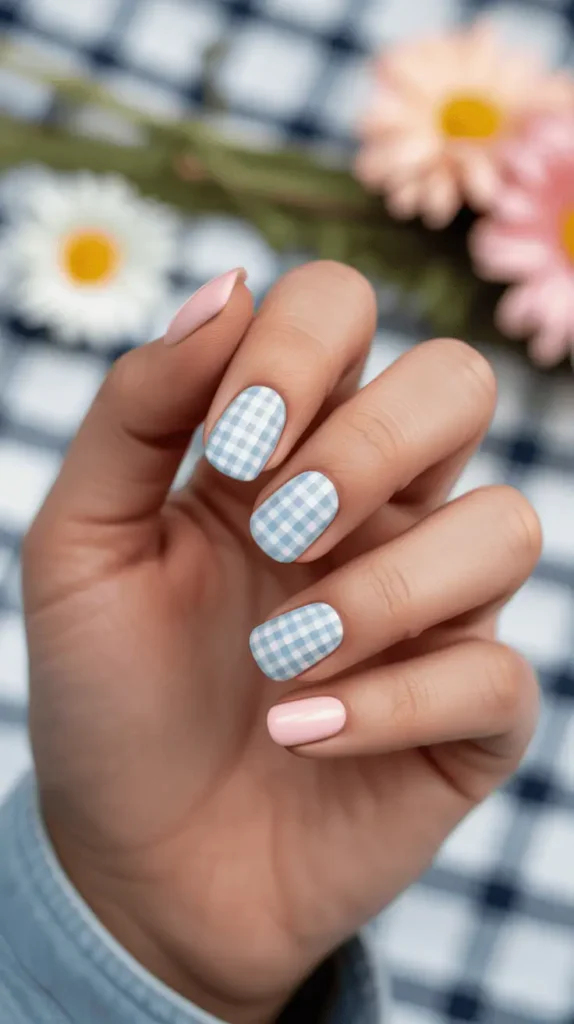
DIY Tip: Honestly, this one is a pain to do yourself. I tried twice and gave up. Save this for when u can afford a salon visit OR buy those nail stickers from Amazon (the ones from NailsbyJenny are cute!!).
5. Transparent Jelly Nails
If u haven’t tried jelly nails yet UR MISSING OUT!!! They’re like these see-thru candy-looking nails in juicy fruit colors. I did mine in watermelon pink and they catch the light in this amazing way that makes them look wet?? idk how to describe it but they’re sooo cute for spring!

DIY Tip: Mix clear topcoat with a tiny bit of colored polish. TINY BIT!! If u add too much it won’t be see-thru anymore (learned the hard way lol). Do like 3 thin layers and be patient with drying time or you’ll get bubbles!!
6. Pressed Flower Art
Ngl this is probs my fav on the whole list!! 😍 Tiny real dried flowers pressed into ur nails?? SO PRETTY. I wore these to my cousins baby shower and got like a million compliments. They look super fancy but are actually not that hard??
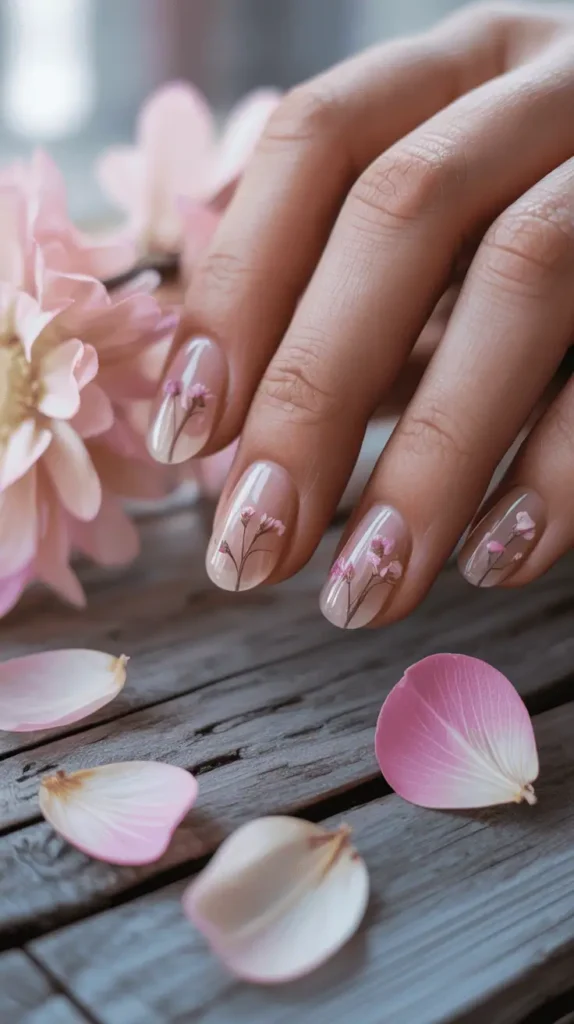
DIY Tip: Buy dried flower kits on Amazon (like $8). Make sure ur base is still a lil tacky when u put the flowers on with tweezers. The trick is to seal with LOTS of top coat – I’m talking 3+ layers or the petals will catch on stuff and drive u nuts.
7. Citrus Slices
The CUTEST summer-is-almost-here vibe!!! Little lemon/lime/orange slices on white or clear polish are just so happy looking!! I did these last weekend for a rooftop brunch and my bestie literally made me do hers the next day.
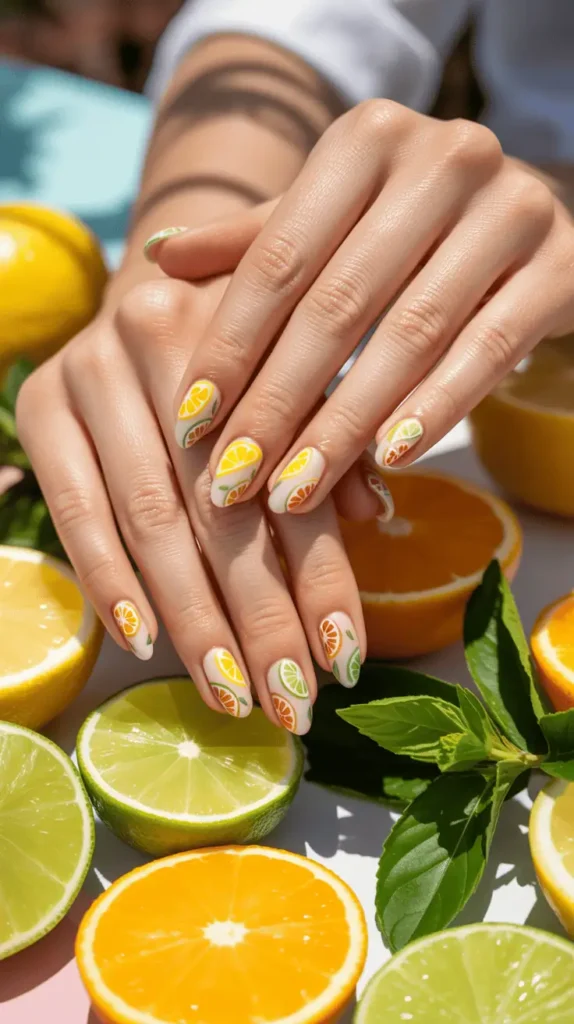
DIY Tip: Not gonna sugarcoat it, these r kinda hard to DIY unless ur good at nail art. I use a toothpick to make the little segments. OR just cheat and buy fruit fimo slices online (they’re like $3 for a pack with different fruits).
8. Sage and Gold Geometric
This is my sophisticated nail choice when I wanna feel like I have my life together lmaooo. Sage green is still having its moment and adding those gold geometric accents makes it feel special but not too extra. Wore these to a job interview last week and felt so confident!!
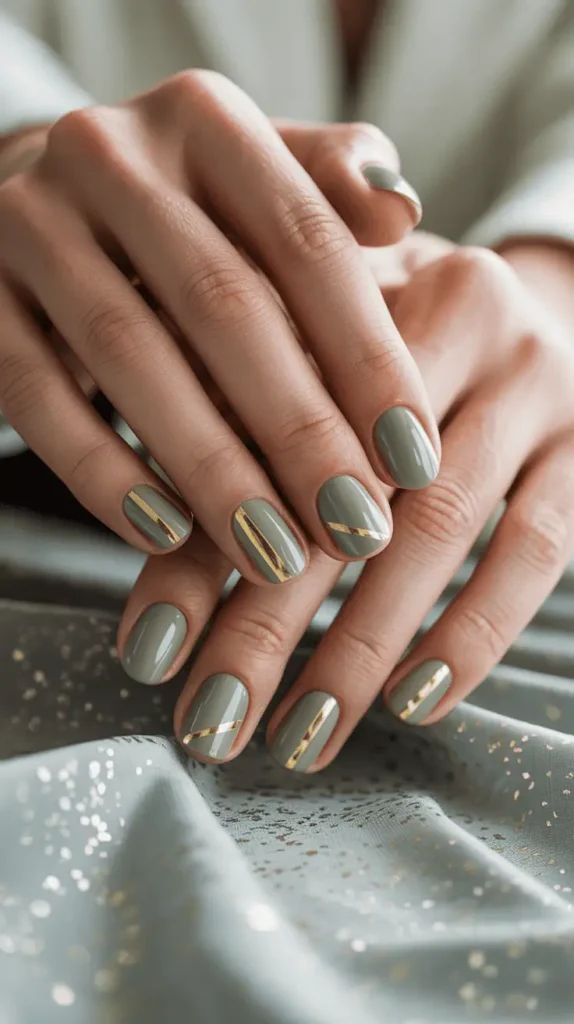
DIY Tip: Washi tape is ur BFF for this!! Put down the sage polish first, let it dry COMPLETELY, then use thin washi tape to block off sections before applying gold. I legit ruined my first attempt being impatient so learn from my fail!!
9. Cherry Blossom Ombré
I saw someone do this on TikTok and HAD to try it!! Its this gorgeous pink-to-white ombré with tiny cherry blossom branches painted on top. Gives major romantic vibes! My sister wore something similar for her anniversary date and her husband actually noticed her nails for once 😂

DIY Tip: The ombré part isn’t too bad with a makeup sponge, but those tiny blossoms are HARD. I cheated and got nail stickers for the flowers part cuz my attempts looked like blobs lol.
10. Negative Space Crescents
These are so chic and minimalist!! Clear crescent shapes against colored backgrounds. I like doing this with bright spring colors like coral or turquoise. They look super high-end but are actually not that hard?!
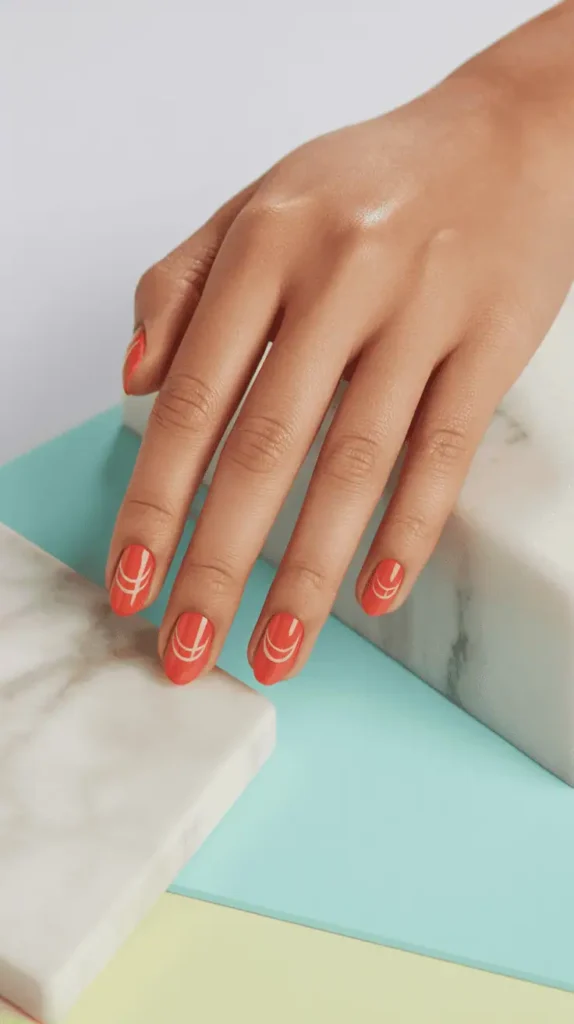
DIY Tip: U can buy crescent nail vinyls online or make ur own by cutting tape. BUT make sure ur colored polish is 10000% dry before putting on the stickers or it’ll pull up and look messy AF.
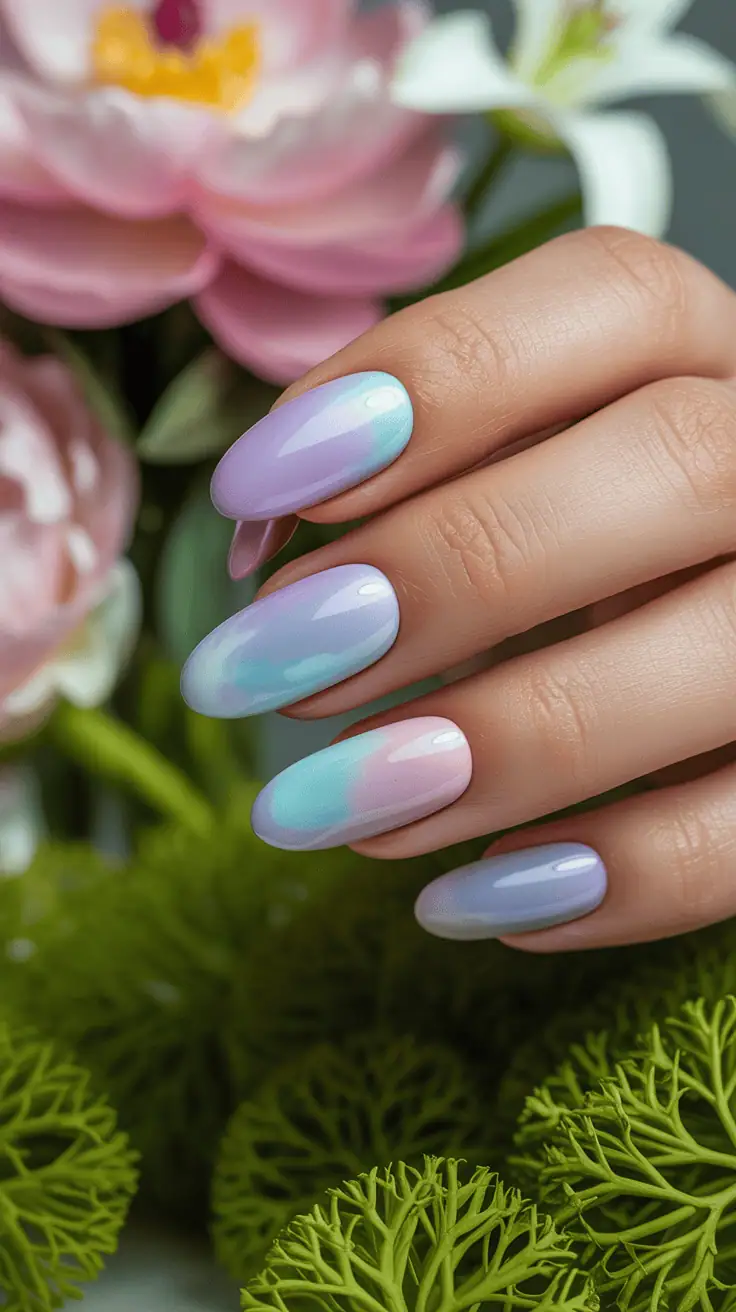
11. Meadow Green Marble
Found this inspo on my fav nail artist’s IG and I’m in LOVE. It’s dark and light greens swirled with white to look like marble but also kinda like spring leaves?? Hard to describe but trust me its gorgeous and goes with everything!!
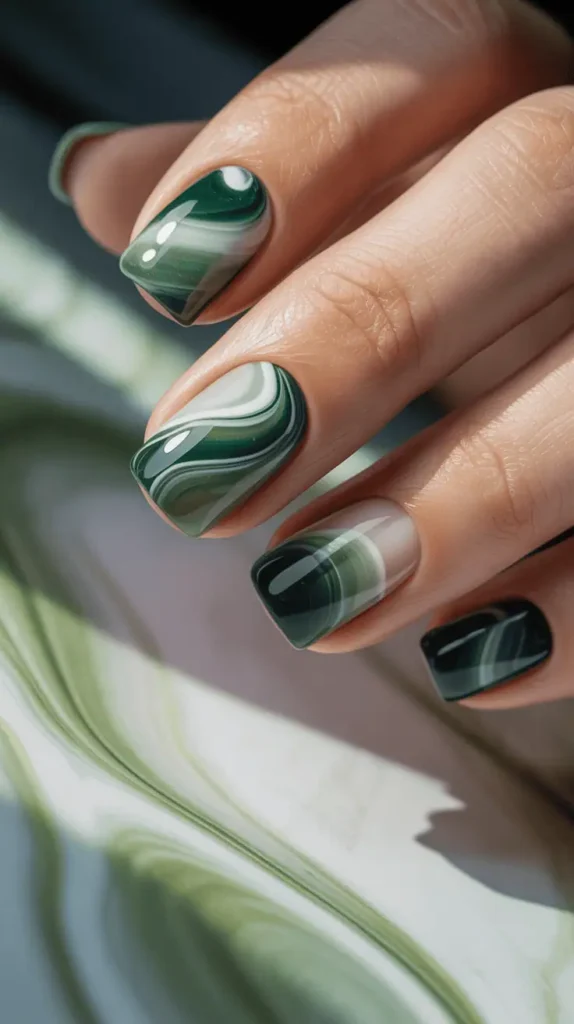
DIY Tip: Use a white base, then drop green polish on while it’s wet. Use a toothpick to swirl but DON’T overdo it or it gets muddy looking!! Took me 3 tries to get it right lol.
12. Iridescent Butterfly Wings
This might b the most extra look on the list but OMG IT’S SO PRETTY!!! It’s this shimmery polish that shifts colors in diff lighting like real butterfly wings! I wore these to a festival and kept staring at my own hands like a weirdo 🙈
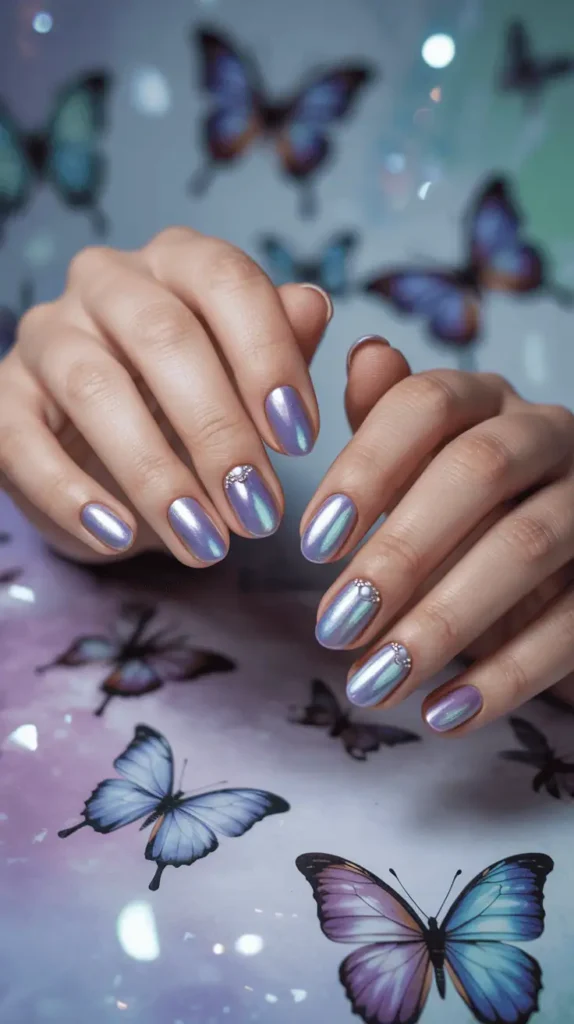
DIY Tip: Layer color-shifting topcoats over white or v.light pink. If u want actual butterfly patterns, u need stamping plates which is a whole thing… maybe just ask ur nail tech for this one unless ur super crafty!
13. Lavender Herringbone
LOVE this combo of girly lavender with the more structured herringbone pattern! It’s like the perfect mix between feminine and modern. Plus lavender is having such a moment this spring, it’s literally everywhere!!
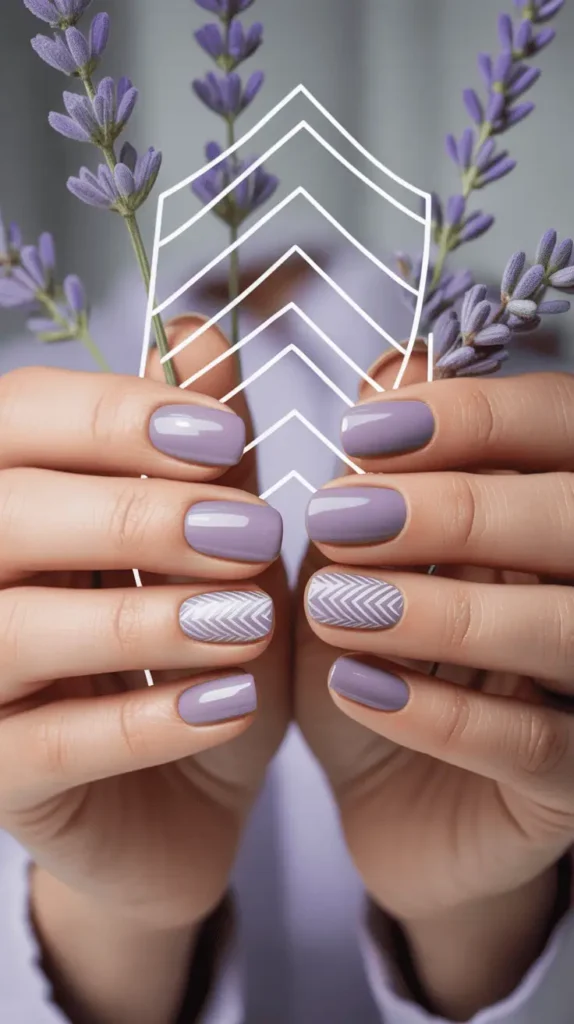
DIY Tip: This one is wayyy too fussy to DIY unless u have crazy steady hands. My attempt looked like a 5yo did it lmao. Just save this for a salon visit!!
14. Rain Drop Glitter
I was getting SO sick of all the rainy days we’ve had but then decided to make the best of it with this cute raindrop nail art! It’s just clear “droplets” with fine glitter over pastel backgrounds. Sounds simple but looks amazing IRL!!
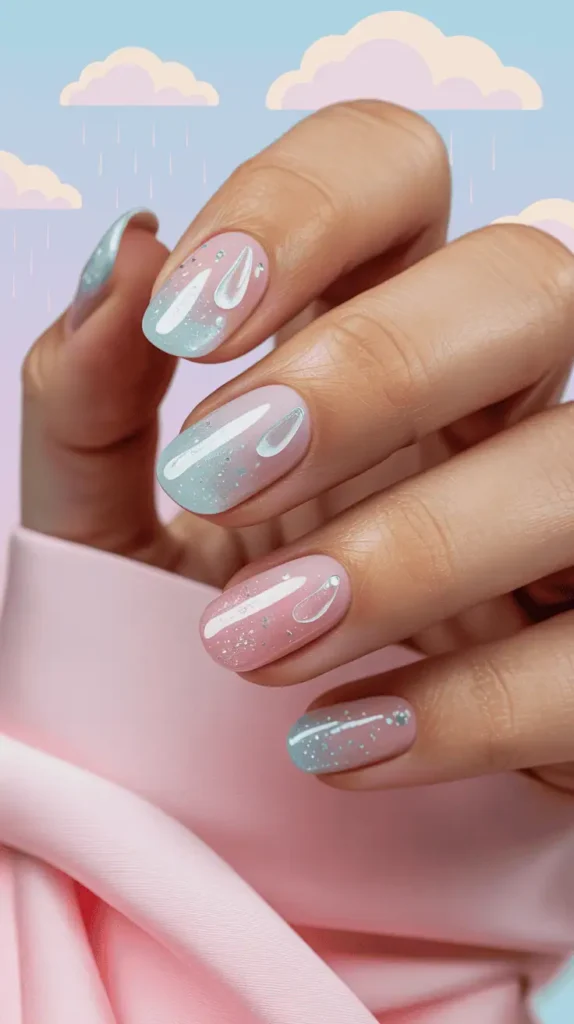
DIY Tip: Do ur pastel base first, then use a dotting tool with clear topcoat to make droplet shapes. Sprinkle fine glitter immediately b4 it dries. WARNING: this gets messy af so put down paper towels first!! Learned that one the hard way when my bf found glitter in his cereal 😬
15. Mint Chocolate Chip
OK THIS ONE IS MY FAVE!!! It’s mint green with lil chocolate flecks just like the ice cream!!! So cute for spring but also makes me hungry everytime I look at my hands lolll. Got so many compliments on this one last month!!
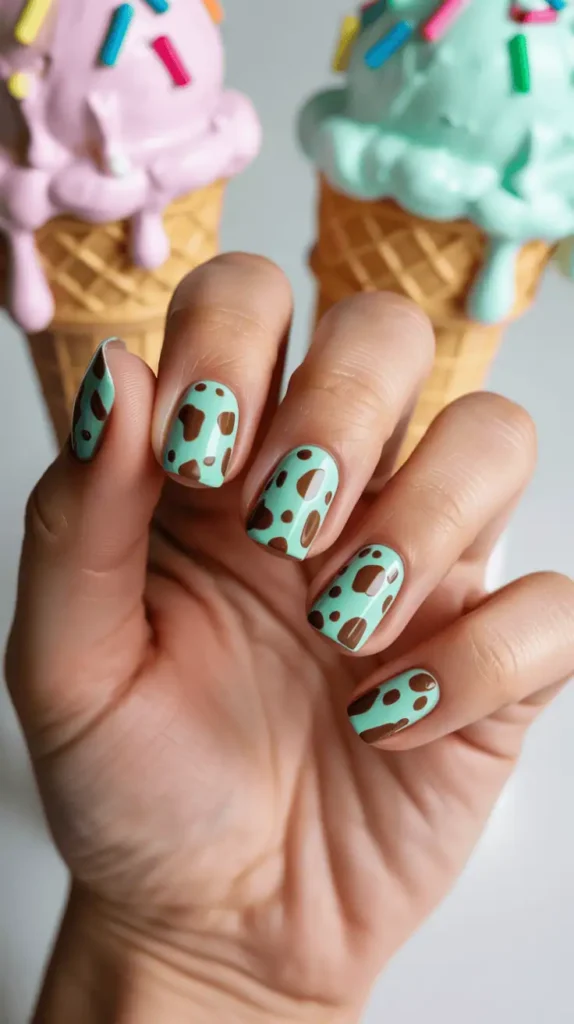
DIY Tip: Mint polish first, then flick brown using an old toothbrush! Super easy and actually BETTER if it’s kinda messy and random! One of the few designs that actually looks good when u DIY.
How to Make Ur Spring Nails Last Forever (or at least a week lol)
What You’ll Need:
- Base coat (seriously don’t skip this step!!)
- Top coat (I use Seche Vite and it’s amazinggg)
- Whatever polish colors ur feeling
- Makeup sponges for ombré stuff
- Thin brushes if ur brave
- Dotting tools (bobby pins work too)
- Acetone + q-tips for fixing mistakes
- Cuticle oil (game changer!!!)
Steps to Not Mess Up Ur Mani:
- Prep ur nails – remove old polish, push back cuticles (GENTLY omg I made mine bleed once and it hurts so bad!!), and file to whatever shape ur into rn.
- Base coat!!! I can’t stress this enough! Skipping this = yellow stained nails and polish that chips on day 2. Not cute.
- Color time! Thin coats are wayyyy better than thick goopy ones. Usually need 2-3 depending on the color (reds always need 3 for some reason??).
- Wait between coats OMG. Like actually wait. Scroll TikTok or whatever but WAIT or you’ll get bubbles and it’ll never dry properly.
- Clean up the edges with a lil angled brush dipped in acetone. This is the diff between “I did these myself” and “I look like I got a professional mani”!
- Top coat – don’t forget to seal the edges! Run the brush along the tips to prevent chipping.
- Cuticle oil makes everything look expensive. I keep a roller in my purse and apply constantly like a crazy person.
Shop the Look: Products I’m Legit Obsessed With


Essie “Mint Condition” – The PERFECT mint green, not too blue or yellow. I’m on my 2nd bottle already! ($9.99 at Target but sometimes on sale)
OPI “Lavender Land” – This purple is so pretty and sophisticated, not like the kiddie lavenders. It’s a splurge but worth it. ($11.99)
Seche Vite Quick Dry Top Coat – Changed my LIFE. Dries so fast and makes everything super glossy. Only downside is it gets thick halfway thru the bottle but I still buy it over and over. ($10.49)
KISS Nail Art Tool Kit – Has everything u need to start doing cute designs and wayyy cheaper than buying everything separate. Found mine at CVS! ($12.99)
Sally Hansen Cuticle Rehab Oil – My nails were so dry and gross before I started using this! Now they actually look healthy. The pen applicator is so convenient. ($7.99)
Starter Kit Recommendation: Beetles Pastel Spring Gel Polish Kit – If ur new to doing ur own nails but want them to last, GET THIS!!! It has all the spring colors, base+top coat, and a lil LED lamp. Seriously the best $30 I’ve spent in forever!!
Color Combos That Just Work
Trust me on these combos – they look amazing together:
- Garden Party: Sage green + soft lavender + pearl white (wore this to Easter and got soooo many compliments!)
- Citrus Splash: Coral orange + lemon yellow + crisp white (perfect for the beach trip Im planning!!)
- April Showers: Periwinkle blue + misty gray + silver shimmer (this combo is weirdly flattering on everyone??)
Final Thoughts cuz this got wayyyy too long lol
PHEW! That was a lot!! But honestly I could talk about nails all day (just ask my bf who has to hear about every new polish I buy 😂).
Anyways hope u found some inspo for ur next mani!! These are all perfect for late spring and will transition great into summer too. My personal faves are the mint chocolate chip and the pressed flowers but lmk which ones u like best!!
Don’t forget to save this post!!! I always find the cutest nail inspo and then forget to screenshot it 🤦♀️ Tag me if u try any of these looks cuz I’m nosy and wanna see!!
xoxo, Jess 💅✨
P.S. My next post will be all about summer sandals that won’t give u blisters… stay tuned!!